400TX

Unsolicited editorials on cameras, lenses, film, developer, and black and white photography in general.

My Photo
Name:
Location: New Orleans, Louisiana, United States

Wednesday, June 28, 2006

Classic 200 in PMK Pyro

Kodak, Ilford, Fuji, and Agfa never marketed a ISO 200 black and white film that I’m aware of at least not during my generation of photographers. I suppose that it was considered a poor marketing strategy to have a film only one f-stop away from ISO 100-125 and ISO 400. The smaller European film makers don’t seem to feel that way. I have recently purchased ISO 200 black and white films by Foma, Forte, Bergger, Classic, and Paterson, and I have seen ISO 200 B&W film from Arista (although I assume this to be a relabeled film from one of the manufacturers above). Classic 200 is among the least expensive of the ISO 200 films, and it is advertised to have a classic retro look. I decided to try some in a retro developer. Digitaltruth had a starting time of 11 minutes, so I expected a usable roll of negatives.

First the bad news. Classic 200 is grainy; it is very grainy. The grain is what I would expect with ISO 3200 film. One other minor cause for concern with Classic 200 is the film cassette. The cassette of my first roll seemed a bit delicate. The lips of the film opening were slightly agape, and my film was light-struck near the beginning of the roll. As a result, I’m putting the rest of the Classic 200 in black plastic canisters and loading/unloading the film in very subdued light.

Now the good news. It stains very well with PMK Pyro developer (although the staining action of the pyro wasn’t enough to suppress the grain). After a rather shocked reaction to the grain when I opened the first frame in PhotoShop, I began to appreciate other aspects of the film. One thing that impressed me is the smooth consistency of the grain structure over the entire negative. Maybe this is from being relatively silver-rich (as these older films are always touted to be). When I go carefully over an entire TRI-X negative in Photoshop to touch up dust specks, I sometimes see what appear to be gaps with missing silver or less silver. Although they do not affect the appearance of the final print, their presence (or I suppose I should say absence) is puzzling. I saw none of this on any negative in the Classic 200 roll. I suppose I might also add that one of the negatives in a roll of Foma 200 I shot last week had a nice round hole in the emulsion. While it was small enough to patch with the healing tool, it suggested to me that some of the machinery used to make films in Eastern Europe might be dated.
The inevitable question that arises is “Why would someone want to buy ISO 200 black and white film that is as grainy as ISO 3200 film?” That is a legitimate query. One reason might be the price (it is about the cheapest B&W film out there). Another might be the lower speed. I went out shooting one very bright day with Fuji 800 in a Leica CL. Even with the shutter speed set at 1/500th and aperture at f/22, some shots were overexposed. I don’t fiddle with neutral density filters. For me, ISO 200 is easier to work with than is ISO 3200. I don’t care much for apertures smaller than f/5.6 unless I’m shooting with a 28mm or wider.

As it turned out, one of the subjects I shot with my first roll of Classic 200 worked well with lots of grain. I went to my now gutted church with several Presbyterian visitors from South Carolina. The inside of the church has been stripped of nearly everything except the chandeliers. I thought the soft graininess of Classic 200 worked well when shooting the stark interior of the church.
Another retro developer, 777, seems to tame grain well. I’ll try that combination in the coming weeks.

Monday, June 26, 2006

A Russian Journal

I loved reading John Steinbeck as a child. He wasn’t too deep for a 12-year-old, he didn’t use a lot of obtuse symbolism, and he relied more on prose than poetry. I liked reading a storyteller’s point of view, and Steinbeck was a gifted storyteller. As a 12-year-old, I had never heard of Robert Capa (he was killed when I was four years old), and never read A Russian Journal by Steinbeck as it was never on a reading list (but should have been). It is an obscure enough book to be absent from your local bookstore, but it is worth reading. No much longer than Of Mice and Men or The Pearl, A Russian Journal is the account of a trip Capa and Steinbeck took together to Russia in the late 1940’s. Both men wanted to know what post-war Russia was really like; Steinbeck wanted to write about it and Capa wanted to photograph it. Only Capa was censored (to a small degree) by the Russian government. I admire both men for what they did, i.e., move to the top of their game without a lot of fanfare preceding them. However, the two were not kindred spirits. The friction experienced between the traveling companions adds a bit of charm to the journal. In fact, Steinbeck even allows Capa to write an entry in the journal detailing his annoyances with Steinbeck. Steinbeck was equally annoyed with Capa. To give any details of the book would be recapitulating what Steinbeck can say far better than I. It’s a nice, short read. Once you get a taste for Robert Capa’s personality in this book, order Blood and Champagne for a more in-depth picture of the man.

Sunday, June 25, 2006

Ilford FP4+ in Panthermic 777

Last week, I shot a roll of Ilford HP5+ and developed it in 777. I wasn’t expecting much. I don’t know of anyone who uses 777 developer, and I cannot even buy it in the USA. It is available at Frugal Photographer in Canada, and I ordered two bags of it on a lark. I wouldn’t have even known that 777 existed had I not mentioned on the Leica Users Group forum that I’m trying to recreate the look of black and white photography from the mid-20th century. The three suggestions I got were (1) use 50-year-old lenses, (2) use old style film (such as the films still made in Slavic countries using 50-year-old machinery and formulas), and (3) use older formulas of developers that have fallen out of favor. I did delve into pyro developers (with good results) and decided to use 777 based on its popularity with photojournalists back in the mid-20th century. The results I got from Ilford HP5+ and 777 were pleasant. They were also the best results I have ever gotten from HP5+. These days, it takes a lot to get me excited. Having a developer work much better than I expected does get my attention.

Ilford FP4+ is one of my favorite films for pyro developers, so I decided to see what it would look like developed in 777. I have used fine grain developers with fine grain film in the past, and the results were always mushy. Thus, I didn’t hold much hope for this combination. Panatomic X developed in Microdol X looked like crap when I tried it back in the 70’s. If FP4+ in 777 turned out to be a similar disaster, I could scratch 777 off my list of developers and simplify my life. It didn’t turn out that way.

The screen shots of the images don’t do this combination justice. You really need to see the print to see the excellent scale, the rich grays, and the luminosity. Zones I-X are all there, all in their correct places. I’m afraid that I have to put D-76 away for the moment. I won’t pour it down the sink; I’ll keep it in its completely filled amber bottle, under the sink. Perhaps I’m having a hormonal imbalance here. This 777 developer looks like a chemist's mistake. It has flecks of black garbage suspended in it. It couldn’t care less which temperature you use. It prefers 75F, but you can use it warm or cold and it still works. It lasts forever as long as you remember to replenish it with a jigger or so of unused 777. The look is not as retro as I get with PMK Pyro, but I do like the effect. It is perhaps most similar to Kodak’s D-23 formula, the favorite of Zone System devotees. And it scans well.

And it is supposed to get better and better with age. Well, I guess Foma 200, Forte 200, or Bergger 200 will be my next film for 777. Stay tuned for results.

This is just a grab shot at the zoo of a distant white tiger taking a snooze.

Below it is an enlargement of the tiger portion of the photo to show detail.
FP4+ in 777 yields minimal grain while still retaining good detail. Actual enlargements from these scans look far better than the screen shots.


Saturday, June 24, 2006

The Fool Proof Samigon Reel

Don’t let anybody tell you that loading a stainless steel reel with film is like riding a bicycle. In 1968, I could do both. In 2006, I can barely ride a bike, and you can forget having me load a stainless steel reel in the dark. My first 35mm and 120 negatives were developed in a Kodacraft tank with film aprons. If you're under the age of 40, you don’t remember aprons. They were film-length pieces of clear plastic with corrugated edges. You would tuck the leading edge of the film under a loop at one end of the apron, and then roll the two together into a coil. The corrugated edges of the apron kept it from directly touching the film except at the edges. Those corrugated edges left a narrow gap between the film and apron, allowing developer and fix to reach the film. The rolled up apron and film went into the lightproof Kodacraft tank. Unfortunately, the Kodacraft tank had an open orifice on the lid with no cap. Agitation consisted of moving the tank on a flat surface in a figure-8 motion. Primitive to be sure, but very easy to use. But I wanted to invert the tank during agitation, so I went to the other choice, stainless steel reels and tanks. Loading a stainless steel reel took a lot of practice, and I spent considerable time watching Gunsmoke reruns at 11:00 P.M. while loading and reloading a 35mm stainless steel reel with a roll of old film.

After a hiatus from photography of about 18 years, I washed my old stainless steel reels and gave them another shot. Forget it. All thumbs. Crinkled film. Too aggravating. So I bought some Paterson reels. Very usable, and much easier to load, at least in 35mm. But there was still a bit of a challenge getting the film into the narrow tracks of the reel. With most plastic reels, loading involves shoving the film lengthwise into a spiral track. Unless the conditions were perfect, I could spend 20 minutes in a dark, non-air conditioned bathroom trying to get the film into the small insertion point on the reel. It became much more difficult when I started buying some rather tightly-curled Europeans films. Those were a challenge in 35mm and completely ridiculous in 120 format.

A perusal of the B&H Photo site yielded Samigon plastic reels. According to the description, they are fool proof. These reels look very much like Paterson reels, and they fit perfectly in Paterson tanks and Samigon plastic tanks.

Which is the Paterson and which is the Samigon?

Like Paterson reels, they have a larger diameter than stainless steel reels and will not fit in stainless steel tanks. They also load just like Paterson reels but have a major improvement. At the base of the entry spot on the reel, they have a very large deck that you can place the film end on, guiding it into the narrow entry slot with your index finger. Paterson reels have two short nibs to help you find the entry slot. Samigon gives you a contiguous platform.

The Samigon reel on the right has a contiguous entry ramp to get the film started on the reel.

The fool proof Samigon reels have no instructions, and it took a few minutes for this fool to figure out that the reel has to be taken apart to remove the developed film. Like the Paterson reels, a clockwise turn of the right side unlocks the two sides and allows you to pull them apart. This is also a major plus. Instead of pulling the wet (and fragile) film out of the reel lengthwise, it will easily plop out into the Photo-Flo bath. Fewer chances to scratch the emulsion.

Speaking of Photo-Flo, it is best not to immerse plastic reels into Photo-Flo solution. Residue tends to accumulate on the plastic, causing binding when trying to slide the film in the slot. Also, since you will be pushing about five feet of film into a spiral track, it is vital that the leading edge of the film not have any rough edges or spikes. I generally make a rounded leading edge with scissors before trying to load the film. Also, both Paterson and Samigon reels use a pair of ball bearings to "grab" the film while ratcheting it into the reel (visible in the second photo above). I have gotten several Paterson reels with a ball bearing that didn't jiggle freely in its slot. If both ball bearings don't jiggle freely in their slots, you cannot feed the film into the reel.

777 Developer - II

I didn’t have a good feeling about how the first roll of HP5+ would fare in a newly-mixed batch of 777 developer. Those familiar with the developer say that the mixture gets better with time and use, and not to expect success with the first few rolls. It fared better than I expected. I decided to try people as subjects. Portraits would really put the film and developer to the test. Two of the test shots were indoors and one was outdoors in the noon brightness. My assessment?
  • Low contrast, or long scale. I’m not quite sure which descriptor applies, but I like it. HP5+ always seemed too high in contrast and darkly muddy, especially with portraits. In 777, there seems to be better representation of zones III through VII.
  • Fine grain. This was no surprise. With all of the sulfite in this developer, along with the caveat that the reused developer would be sludgy with silver, I expected a lot of grain solvent activity.
  • Smoothness. Old-timers refer to a glow in 777-developed film. It looks like a softening of hard edges in these images.
  • Nostalgic look. This developer was a favorite of photojournalists beginning in the 1940’s, including Life magazine photographers and Magnum photographers, including Henri Cartier Bresson. Not surprisingly, the prints (more so than the screen shots) are reminiscent of black and white photographs of that era.

All of these characteristics bring me to the conclusion that this is a good developer for black and white work, and particularly good for people pictures. The fine grain, low contrast, long scale, and smooth lines remove the harshness of unfavorable lighting, wrinkles, old age spots, and pores.

Portrait number 1 is photographer Chris Williams. This was shot in a restaurant with Chris facing a large window with bright noon light. The highlights in the negative (i.e., Chris’s face) were a bit blown out. Before Photoshop work, his skin was closer to Zone IX than Zone VI. I blame the developer being a bit overactive. Still, the portrait was salvageable.

[Click on the photo for a larger version]

Portrait number 2 is Tom Gruber, a 65-year-old ex-football coach turned teacher and now administrator. Years of standing at the sidelines soaking up sun have taken a toll on his skin, but 777 has smoothed things out a bit.

[Click on the photo for a larger version]

Portrait number 3 is Tom’s cousin, Billy Gruber, the owner and operator of Liuzza’s Restaurant near the New Orleans fairgrounds. He wasn’t too keen on getting his picture taken (which is good…he has some expression). The picture was shot in bright shade at 11:30 AM on a cloudless day.

[Click on the photo for a larger version]

I’ve got a dozen or so rolls of HP5+. Given the encouraging results here, I think I’ll use them all up in the next few weeks and see if I can tame the developer’s activity with a little use.

Thursday, June 22, 2006

777 Developer - I

So, what is 777 developer? It seems to be the same as Harold Harvey’s Panthermic 777 Developer and, consequently, may be identified in one of many ways, all of which have 777 in the title. The bag that I bought was labeled “Panthermic 777 Developer” by BPi Industries, Inc. If they are an actual industry, they might think about upgrading their printed materials (which are dated March of 1980 and look like they were created on a badly functioning mimeograph machine). The instructions appear to have been translated to English (e.g., “Dissolve Part A [by the way, there is no labeling of the parts in the package] in small quantity of hot boiling water, 140oF.” Okay, what is it? Should the water be 140oF or 72 degrees hotter at 212oF? And which packet of chemicals is Part A? Well, reading further, they indicate that it is normal for Part A to be brownish in color. We’re off to a shaky start.

A review of the available documentation on the Internet (minus the forum posts) gleaned this:

  • It works well at a broad range of temperatures (60oF to 90oF), the best temperature being a nice room temperature 75oF. This latitude in developing temperature accounts for the name Panthermic (though you do have to adjust the developing time for any specific temperature). This certainly would have made it useful in tropical and subtropical climates.
  • You can use it over and over again, with replenishment, using additional 777 developer as the replenisher.
  • It works best in large tanks (for one roll of 35mm, it is recommended to include an empty reel and use a larger developing tank).
  • Using fresh 777 on a roll of 35mm film is likely to give unpredictable results. In fact, using fresh 777 on anything seems to be asking for trouble. You have to use it up a bit, with replenishment, before it gives you acceptable, repeatable results. It is best to work the developer a while and then start replenishing it. The new developer added to the old developer then strikes a happy medium.
  • The developer contains glycin (not to be confused with glycine), and accounts, in part, to the cloudiness of the solution and the “glow” of the resulting prints.
  • The printing characteristics of the negatives are similar to that yielded by Pyro developers.
  • The formula for 777 is a closely guarded secret, but Ed Buffaloe feels that it is a fine grain developer of known composition containing 7g metol, 7g, paraphenylene diamine, and 7g glycin, along with 70g sodium sulfite and 700 ml water. That’s a tempting hypothesis, but seems a bit James Bondish to me.
  • It becomes cloudy to sludgy after repeated use (but can be filtered). Apparently the sludge is, in part, silver from the film’s emulsion. This implies to me that it is a fine-grain developer with a grain solvent that might be best suited for conventional fast (ISO 400) films. It is purported to yield very smooth, fine grain with long scale.

According to one of the sources, this developer was used by Life Magazine and a number of photographic agencies such as Magnum as early as the 1940’s, and that some very prominent names in B&W photojournalism used 777.

The best “discussion” on this developer (although it has some speculative parts in it) is on the unblinkingeye site. They mention that the appearance of the developer doesn’t inspire confidence. That’s putting it mildly. After mixing the stuff up 5 days ago, I decanted (carefully, like an aged port wine) 600 ml of developer into a mason jar. Out with it came a lot of suspended black flakes, an appearance reminiscent of some Japanese soup I had a few years ago. But this didn’t have seaweed in it. I took the liberty of filtering out the black stuff with a Melitta coffee filter. The pros say that you should use some unimportant film for the first few rolls. That would describe any images on HP5+, even if they were of the Loch Ness monster. I’ve never been able to get Ilford HP5+ to look good with any developer. Using 777 on it would either provide me with a miracle or give me a good way to get rid of the rest of that film. Suspecting that the freshly-made developer might be a bit too lively, I went for the minimum developing time of 9 minutes at 73oF. My results? Tomorrow. The film is still drying and I won’t have the negatives scanned until late this evening.

Tuesday, June 20, 2006

The 40mm Lens Makes a Comeback

There are several hypotheses as to why a 50mm lens came to be thought of as the “normal” lens, i.e., the focal length for 35mm film that best approximated how the human eye perceived the view in front of the camera. My best guess is that Leica decided to make a 50mm lens and it became the standard that others followed. But is it the most “normal” view?

I have read from several sources that the length of the diagonal of the 35mm frame would be the focal length that bests approximate a normal view. Given that a 35mm frame is 24mm x 36mm and using the Pythagorean Theorem, 362 + 242 = 432 (approximately). So, 43mm would be the ideal “normal” lens (not the one that fits the norm, but the one that best approximates the aspect seen by the eye. Applying the same hypothesis to medium format film (6cm x 6cm), the ideal normal focal length would be around 85mm. Okay, that seems about right. So why are there so few 40mm lenses out there?

Well, 40mm (+/- 3mm) aren’t that rare in the fixed lens rangefinder world. My Olympus SP has a 42mm lens, and I recall my Konica Auto S3 having a 38mm lens. The ubiquitous Canon G-III QL17 has a 40mm lens. So, 40mm seems normal for a fixed lens rangefinder, but 50mm is more normal for an interchangeable lens rangefinder? Hmm. Perhaps if 40mm had been the normal focal length for interchangeable lens rangefinders, the 35mm focal length would have suffered in sales. Whatever the case, there appears to be a sudden resurgence in 40mm lenses for interchangeable lens cameras. And I like the focal length.

To be fair, Leica sold a 40/2 Summicron on its Leica CL in the early 1970’s, and the follow-up Minolta CLE had a similar 40/2 Rokkor lens. An Elmarit-C 40/2.8 appeared briefly but was quickly pulled from production. But for the next 25 years, fixed-lens rangefinders disappeared from inventories, along with their 40mm lenses. Then, as quickly as they became extinct, we see:

45mm Planar on the Contax G cameras

40/2.8 Sonnar LTM lens on the Rollei RF (a Cosina made body). The 40/2.8 lens on the Rollei 35 was a killer lens, so this was a nice reintroduction to an old favorite.

43/1.9 Pentax was released in two versions, an autofocus model for the Pentax SLR, and an LTM model for Leica mount cameras.

40/1.4 MC Nokton (Voigtländer) for Leica M-mount cameras.

40/1.4 SC Nokton (Voigtländer) for Leica M-mount cameras (a single coating version for those seeking the older, lower contrast qualities for black and white shooting).

40/2.8 Pentax pancake lens for Pentax SLRs.

40/2.8 Nikkor pancake for Nikon SLRs.

45/2.8 Tessar pancake for Contax/Yashica SLRs.

I know I missed one or two, but eight lenses in this focal length range makes me a happy man. For rangefinder users, I think that the new Voigtländer 40s are the best news. This is a very small lens that you won’t mind carrying all day that can shoot in low light. It's the smallest fast “normal” lens I’ve had since the 50/1.5 Zeiss for the old Contax II mount. I wonder if Leica is ever going to design and sell another rangefinder lens. If they do, I hope that it is a 40mm Summicron or Summilux, and that they make it small. Until then, my 40/2 Rokkor and 40/1.4 Nokton will serve me well.

Monday, June 19, 2006

Are Digital Cameras Improving Photography?

Is the advent of good digital cameras improving photography? On the surface, the majority of people with digital cameras would probably concur. And in some ways, it has. Several years ago, there was a fellow who frequently posted his work on the web and advertised it to the Leica Users Group. The only consistency in this man’s work was that it was always dreadful. Some of the folks on the LUG tried to give him suggestions for improvement (always ignored), and finally he was flamed off the LUG as a troll. I don’t think so. I think he was just a terrible photographer. But something did improve his images. He bought a digital camera, which did his focusing, his exposure control, and whatever else a digital camera does on “Program” mode. My reaction? That’s better…now some of his pictures are in focus. Just about everyone who didn’t know how to compose a decent photo does better with digital than with their old point and shoot film camera. But is their photography (technically speaking) any better? I wonder.

I noticed a similar phenomenon back in the mid-1980’s when the personal computer was in its most rapid growth phase. I recall reading an issue of PC that tested literally dozens of available word processing programs. Everyone was waiting for the next upgrade, the next peripheral, the next printer. Everyone was truly excited about this new tool. I was teaching college during the personal computer boom, and I saw term papers go from being sloppily-typed and covered with liquid paper to being fully justified, perfectly formatted masterpieces. Until you read them, you could get the impression that the term papers written on the computer were better. They were worse, much worse. They looked better. But they were worse. Why? I suspect that they were composed at the computer, printed, and submitted. No rough draft, no note cards, no working at the library. But the printout was really impressive. From a distance, it looked like a fine piece of research. We had a critical paper shortage in the computer labs because students would type one paragraph, print it, admire how good it looked, and move on to the next paragraph. Personal computers didn’t improve anybody’s writing; it just made the finished product look better.

A digital camera gives me the same cynical feeling. You aim it in the direction of a subject, make sure that the setting is on fully automatic, press the shutter release, and wait for the results on the LCD screen two seconds later. When you see that the image wasn’t so good (but that you have sufficient memory for 624 more shots) you start firing at will. Chances are something will in there will look good. In the world of 9mm street shooting (not street photography with a 9mm lens or 9mm film…shooting at people with 9mm pistols), a similar mentality emerged when Beretta and Glock started making staggered magazines with 16-17 bullet capacities. The bad guys and the good guys started pulling the trigger more and hitting their intended targets less, a tactic known as “spray and pray”. Not good marksmanship.

I have to admit that I have a collection of digital cameras, and that they have lots of features that should make photography easier. But I get burned out trying to figure out what each setting means, no less looking at a histogram on the LCD while trying to compose a subject. Sure, the program setting on the digicam is going to take care of ten different things that will impact what this image will look like. But do I have time to look through the viewfinder and think about whether I agree with how the camera is going to handle each of those ten parameters (or if I should go to another setting)? Nobody does, especially if the subject is moving. No, you push the shutter button until the buffer fills up and hope for the best. I want to control about four things, field depth, focus, the amount of light hitting the film, and framing. I can handle those four parameters; they’re almost instinct now. Would I come out on top in a shootout with another photographer if I had a Leica M6 and he had a Nikon dSLR? Maybe not. But I would have more fun and be more satisfied with the effort than if I had a Nikon dSLR. And isn’t that why I picked up this avocation in the first place?

Sunday, June 18, 2006

War Photographer (2001)


Robert Capa (Andre Friedmann) and James Nachtwey are the two most prominent war photographers of record. Capa's biography, Blood and Champagne, is an entertaining book, as is John Steinbeck's A Russian Journal, a brief summary of a trip to Russian taken by Steinbeck and Capa after WWII. Both are recommended reads.
There is no biography of James
Nachtwey's life [yet], but the documentary War Photographer is certainly a window into his life's work. While Capa and Nachtwey may be the two greatest war photographers, there couldn't be two more different people. Capa was a smoking, drinking, womanizing free spirit who took photographs for the money (to finance the smoking, drinking, and womanizing) and the fame. Nachtwey was cut from a different bolt of cloth. He is reserved, soft-spoken, and pensive. And he takes photographs in hopes of making a difference.
The 90-minute film (video, actually) begins with Capa's familiar quote "If your pictures aren't good enough, you aren't close enough." You then get a very good feel for just how close Nachtwey gets to his subjects. A micro-video camera mounted on the top of Nachtwey's Canon SLR documents his position and distance while shooting in a variety of situations. He does get close, and is able to do so in no small part due to his appearance. He is tall, thin, and completely innocuous in his demeanor. While Capa might have looked like a
swaggering Mediterranean movie star type, Nachtwey looks like a male model for Wall Street business clothing. He looks empathetic, and people let him photograph them during the most terribly tragic moments in their life.
While his primary genre is war photography, there is relatively little emphasis on the dead. A dead soldier might be regarded as a pawn that has been taken out of the game. Once killed, he no longer ceases to exist, at least as a being with feelings. It is difficult to feel sorrow for the dead as they no longer suffer. Nachtwey devotes nearly all of his attention on those who continue to suffer from war, the parents, the spouses, the children, and the siblings of the dead, those still living. And it is easy to grieve for them.
In addition to photographing war, Nachtwey documents destitution caused by poverty and famine. Many of those photographs are far more tragic than the war photographs. And he spends considerable time on deplorable working and living conditions (primarily in Indonesia).
This is not a feel-good movie, and it might not appeal to a non-photographer. I'm not sure I would want to see it twice in the same year. It did garner an Academy Award nomination for Best Documentary Feature in 2001. The primary dialogue is German and English, so there are subtitles. It has been translated (via subtitles) into Spanish, French, German, and Italian.

Saturday, June 17, 2006

Fomapan 200 Creative Film in PMK Pyro

PMK Pyro is known to work well with older film formulations. The newer tabular grain film (Kodak Tmax and Ilford Delta) have less silver in them and, consequently, less staining with Pyro. I have had good luck with Ilford FP4+ in PMK Pyro. I had been looking forward to trying some of the European films such as Fomapan and Fortepan with PMK Pyro.
This week, I took a trip to the Audubon Zoo with some Fomapan 200 Creative, a film manufactured in the Czech Republic. In researching this film, one web site states that it is an advanced T-grain film. Foma does not specify this on their spec sheet. Whatever the case, I was not expecting good results from this film. After developing some test shots, I was pleasantly surprised. The film stains well (N.B. - it is developed with a dilution twice as concentrated as the 1:2:100 generally used for PMK Pyro) and the tonality is quite good without any granularity problems.

The day was fairly bright, so I was expecting blocked up shadows and blown highlights, but the tonal gradation was better than I anticipated. Enlargements from this negative show the granularity to be more than acceptable.

There is grain, but the staining of the pyro appears to keep it in check.
Sharpness is also quite good for a 200 ISO film. At $2.50 a roll, the combination of Fomapan 200 and PMK Pyro should appeal to frugal photographers.

Friday, June 16, 2006

The 50mm Heliar - An Old Design That's Still Superb

My interest in cameras and photography leans decidedly toward “retro”, so when Cosina licensed the Voigtländer name and commenced production of very retro-looking rangefinder cameras, I was an immediate aficionado of the camera and lens line. What made these cameras particularly attractive was the excellent design and stellar performance of the lenses. However, when the Bessa T Heliar 101st Anniversary Set was announced in 2001, I had initially decided to pass on buying that kit. It appeared to be a limited edition collector’s item, designed to be placed in a cabinet alongside the Leica commemorative editions. Then a colleague directed me to a photo posted on a Japanese web site. It was a color photo of a softly-lighted, painted wooden toy in front of a toy store at night. Everything about that image seemed right, sharpness, even contrast, smooth bokeh, everything. Despite the $1,000 price tag and the fact that I already had a Bessa T, I ordered the Bessa T Heliar 101st Anniversary Set that day.

As lens designs go, the Heliar is positively retro. A very simple lens designed in 1900 by Hans Harting of Voigtländer, the first Heliar consisted of five elements with cemented doublets on the front and back. The first few samples had problems with astigmatism and heavy coma. In 1903, Harting changed the sequence such that the three concave elements were surrounded by an outer and an inner convex element, an idea that he may have borrowed from the earlier Tessar. This third design, named the Dynar, is similar to the today’s Voigtländer Heliar.

Voigtländer’s 50/3.5 Heliar has everything that I could possibly wish for in a lens with the exception of speed. But with lens speed comes greater size and weight, and lenses designed primarily for speed generally don’t stack up as well as slower lenses in daylight shooting at medium apertures. What do I like in a lens?

The “normal” focal length of 40-55mm. I am occasionally ribbed on forums for allegedly having more normal lenses than anyone else. Why do I do like normal lenses so much? They are invariably less expensive than longer or shorter focal lengths, they can be relatively fast despite being in a small package, they are less likely to produce the distortion associated with wide angle lenses, and they are easier to focus accurately than are telephoto lenses. And they produce images that look “normal”, i.e., like my eyes perceive the subject. By the way, I have four 50/3.5 Cosina-Voigtländer Heliars in my collection of normal lenses.

  1. Sharpness from center to edge. Most lenses perform best in their center, with resolution falling off at the edges. A well-designed lens should be sharp from center to edge.
  2. Sharpness wide open. Even a very old or crudely-designed lens can perform fairly well when stopped down to f/8. But if you want to keep your subject in focus and the rest of the picture soft, you have to shoot wide open.
  3. Even contrast from center to edge. Like resolution, contrast tends to be higher in the middle, and drops off at the edges.
  4. Even brightness from center to edge. Ultra-wide lenses are notorious for vignetting, and the effect is even worse when you get blue sky in the image at the upper corners. A good lens should not have a hot spot in the center.
  5. Long tonal scale. When color film became the favored medium of professional photographers, lens design was optimized for color. What increased color saturation also increased contrast and decreased tonal scale. I prefer black and white photography, and I try to find films, developers, and lenses that give me a long tonal scale. Sometimes that means buying 50-year-old lenses. Recently, Cosina obliged people like me and released a 40/1.4 Nokton that was single-coated. The raison d'être for that lens is increased tonal scale.
  6. Smooth bokeh. Virtually nobody in the Western World talked about bokeh by name two decades ago, and you will have difficulty finding a definition for it in a modern dictionary or encyclopedia. Bokeh is the rendering of out-of-focus areas of a photograph. While I don’t think that lovely bokeh will make or break a photograph, I do think that ugly, distracting, or idiosyncratic bokeh will ruin an otherwise excellent photograph. Bokeh from mirror lenses is the worst, changing point sources of light into bright circles. Bokeh from modern, aspherical lenses can be distracting, with sources of light showing up as crescents or round, wafer-like objects, some with double-lines. At worst, it can look like an out-of-focus fireworks display in the background. When it is at its best, it is not at all distracting and serves to give the image a three-dimensional feel.
  7. Resistance to flare. I frequently observe posters on forums singing the virtues of a particular lens only to conclude with the regrettable caveat that flare is a problem.

Two versions of the Voigtländer 50/3.5 Heliar have been produced, and both were produced in relatively small numbers in limited-edition sets. The earlier version was a collapsible silver lens in Leica thread mount. A newer version that is still available from some vendors is a rigid lens in Nikon rangefinder mount. Both lenses are very small and very lightweight. They are the same optical design and perform equally well. Like Nikon rangefinder lenses, the aperture scale rotates when the lens is focused. It should take most shooters only a few minutes to adjust to this.

Cosina released the first Bessa R2S Nikon-compatible rangefinder body in 2001, along with a similar Contax-compatible rangefinder body, the R2C. Cosina produced no lens line for the Contax-compatible body, but did release a full complement of modern Voigtländer lenses in Nikon-compatible mounts. This was great news for Nikon users as Nikon rangefinder lenses in excellent condition are in short supply due to being coveted by collectors. At the time Cosina started production of the Nikon-mount lenses, my collection of Nikon-mount lenses consisted of two 50/1.4 lenses in non-collectible condition. Thanks to Cosina, Nikon RF users now had access to very high-performing multicoated lenses, two of them aspherical models. And Cosina appears to have taken special efforts to design these lenses to resemble their Nikon counterparts. I eventually invested in four of the focal lengths I use routinely, from 21 to 50mm. The 21 and 28 are exceptionally compact.

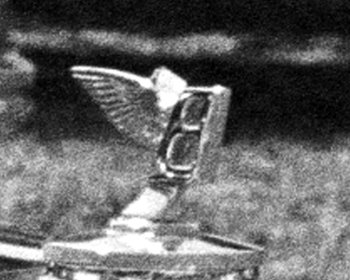
The Voigtländer R2S and 50/3.5 Heliar is my favorite camera/lens combination. My left index finger rests naturally under the aperture ring, steadying the front of the lens, and my right index finger moves naturally to the focusing wheel in front of the shutter release. This allows fine-tuning both aperture and focus without having to move either hand. And with the trigger winder attached below, I can advance the film without having to move either hand or my eye from the back of the camera. Those who are familiar with Nikon rangefinders are aware that the focusing helical is in the camera body, not the lens. This means that the entire lens moves during focusing. Those accustomed to Leica rangefinders invariably find themselves inadvertently changing the focus slightly when changing aperture. I have not had problems with this while shooting with the R2S; the aperture ring does not have click-stops and moves very smoothly and effortlessly when changing aperture. My right index finger resting on the focusing wheel serves as a brake to prevent losing my focus. The Heliar controls flare very well, a must in street shooting where one doesn’t have control over the lighting. The front element is recessed within a deep lens hood. Bright point-sources of light (such as reflections of the sun from a polished automobile) are well-controlled as small, 10-spiked stars of light.

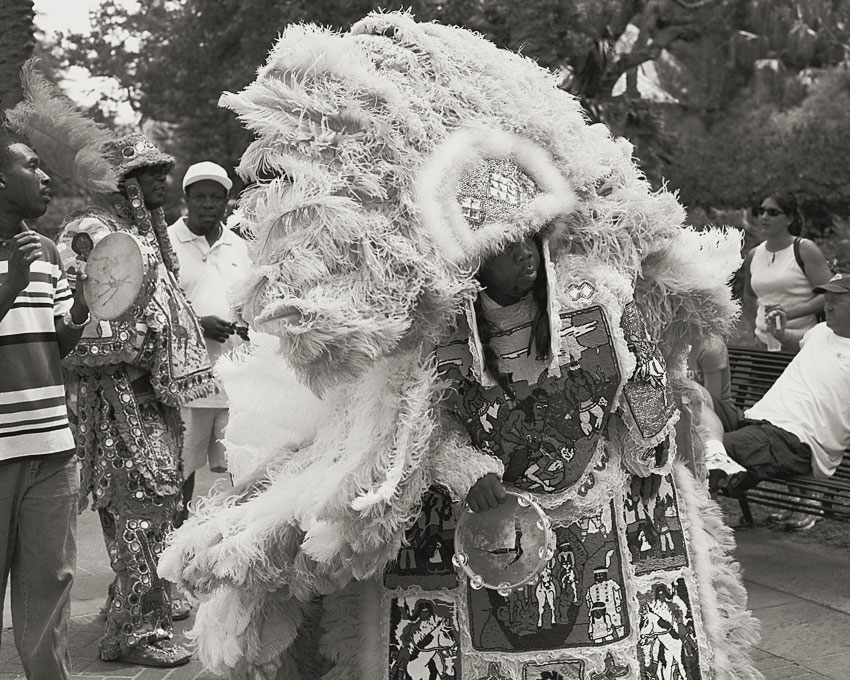
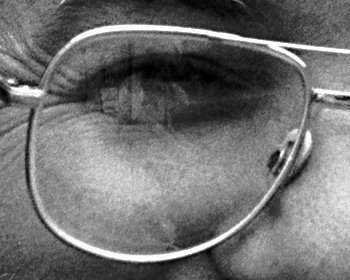
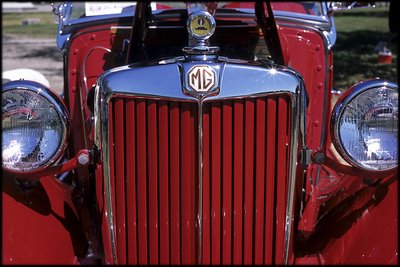
The shot below was taken with a Nikon-mount 50/3.5 Heliar on a Bessa R2S. The lens excels in color and B&W work. It is probably the best all-around lens I have.


The image below was taken on a very bright, dry, cloudless day. The Heliar kept the flare down to small stars. Overall contrast of the image was not compromised by the bright point sources of light from the sun.


Photographers are often asked if they would replace a certain body or lens if it were lost or stolen. That is not an option for the collapsible LTM-mount Heliar as they are no longer available new. And this won’t be an option for long with the NHS R2S Heliar Limited Edition as it was produced in small numbers and relatively few are left. That’s why I have four Heliars…what if something happened to three of them?

Thursday, June 15, 2006

Rangefinder Cameras - Why They Have Survived 80 Years

I very rarely shoot with a single lens reflex these days, but it’s not because I’m in a state of photographic semi-retirement. I’m currently shooting more than I ever have. The advantages of using a single lens reflex are not advantages I need, and the disadvantages of SLRs are enough to make me leave them at home. In fact, people who bought a single lens reflex in the 1970’s and 1980’s and never used a lens other than the 50mm lens that came with the camera should have bought a rangefinder instead. But almost nobody did, and the rangefinder lost its popularity. Enter the autofocus camera, and the rangefinder all but disappeared. So why is there a dedicated following of rangefinder aficionados still around today?

  • It can be much smaller and lighter than an SLR. A Contax T or a Leica IIIf with a 50/3.5 Elmar can fit comfortably in one’s trouser pocket.
  • It has a brighter viewfinder. The viewfinder of an SLR gets dimmer as one uses slower lenses. Because the rangefinder viewfinder does not use the light path through the lens mounted on the camera, the viewfinder is always the same brightness regardless of the lens used.
  • It is (in my opinion) easier to focus. Quickly focusing a rangefinder entails finding a hard edge on the subject and merging two images of that hard edge into one. This advantage is particularly important in dim light. If you can see the reflection in someone’s eye, you can focus on it with a rangefinder.
  • You can use colored filters with black and white film without having your subject in the viewfinder turn bright yellow or dark red. This is another reason why rangefinders easier to focus.
  • It has less shutter lag than an SLR. When you trip the shutter of an SLR, several things must happen immediately afterward. The mirror must move out of the way of the light path to the film, the camera body must quickly close the lens aperture to the desired f-stop, the two focal plane shutter curtains must traverse the light path, the aperture must then return to the open setting, and the mirror must return to the downward angled position. A rangefinder exposure involves only the movement of the shutter curtains.
  • It is quieter than an SLR, for the reasons stated above.
  • It has less vibration during the exposure than an SLR, for the reasons stated above. When you have all of the activity of an SLR occurring right around the fraction of a second of exposure, hand-held shots are generally limited to 1/60th of a second or faster. I’ve never gotten a clean SLR shot hand-held at 1/30th or slower. Mirror flap is the primary culprit.

That mirror box might be the Achilles heel of the SLR. While it allows the SLR photographer to use long telephoto lenses, macro lenses, and close-up bellows/extension tubes, that mirror box is in a very awkward position, right between the lens and the film. This posed a challenge for lens designers. Lenses that once sat closer to the film are now displaced forward due to the mirror box situated in front of the shutter. Major lens redesigns were necessary. The camera body had to be deeper, and SLR lenses were invariably larger and heavier as were their lens elements. And the SLR camera and SLR lens have a shorter mean time between failures due to the mechanisms that must go into play at the time of exposure. Shoot a thousand rolls of film through the SLR and your mirror has flapped up and down very quickly 36,000 times. The mirror flap is damped by thin strips of foam rubber or plastic. These can deform and deteriorate over time, and must be replaced. There is some question of just how accurate critical focusing can be when the mirror may not be resting exactly where it was resting when the camea left the factory years before. A piece of foam doesn't malfunction all at once. The accuracy of the focusing deteriorates slowly over time.

Rangefinder cameras and lenses are legendary for their extremely long lifespan and reliability. It is not uncommon to see rangefinder enthusiasts plunking down money for a 50-year-old rangefinder body and lens with the intention of using it, and using it a lot. And, like the old Volkswagen Beetle, it can see decades of steady service. It might get ugly, but it will still work just fine. Stephen Gandy has a photograph of the late street photographer Garry Winogrand’s Leica M4 on his site. It had seen many years of action, and it still worked just fine. Like all precision instruments, you need to have a rangefinder camera cleaned, lubricated, and serviced every so often, but there is far less to go wrong with them compared to SLR and autofocus cameras and lenses.

The rangefinder was the hands-down favorite of history's street phontographers and photojournalists. The rangefinder is less obtrusive due to the combination of what is written above: small (cameras and lenses), quiet, quick to focus, and easy to frame. And remember that, with an SLR, the subject won’t likely be in clear focus in the viewfinder when you first bring the camera up to your eye. And when you trip the shutter, you lose sight of the subject while the mirror is up. It's very hard to track a moving target when the viewfinder blacks out, and the brief shutter lag doesn't help either. The instant that the subject's image is being recorded on film is the instant you cannot see the subject through the viewfinder.

So why isn’t everyone using rangefinders? There are some downsides to rangefinders.

  • Parallax problems. Because you are not viewing through the actual taking lens, close focusing leads to some parallax issues in which the framing is not quite what you expected it to be. This is really only a major issue when your subject is closer than 5 feet, but it is an issue.
  • Limitations on lens length. This is probably what spelled the demise for rangefinders in the 1970’s and 1980’s. Everyone seemed to get long telephoto envy There were lots of oohs and aahs when you were seen with a long telephoto lens. But I have to admit that most of my long telephotos always stayed in the case in my closet. I just don't shoot sporting events or birds.
  • Macrophotography is not the forte of the rangefinder. There are expensive devices to allow a rangefinder to photograph very small objects, but it makes more sense to use an SLR with a macro lens or with bellows/extension tubes.
  • No zoom lenses. Need I say more? Forget finding a rangefinder zoom. There aren't any. The Contax G2 had what was called a rangefinder zoom lens available, but a Contax G2 isn't a rangefinder. It is an autofocus camera.
  • Accessory viewfinders. Rangefinders excel at wide angle and extreme wide angle photography, but you need to use accessory viewfinders to predict the angle of view, and these accessory viewfinders aren't cheap.

These comments above pertain to 35mm photography. If we move to medium format, everything I’ve said above still applies, and to a much greater degree. The flapping mirror is bigger and slower, the body is heavier, the lenses are slower and heavier, the viewfinder is dimmer, and the camera becomes more awkward to handle without a tripod. But you can get a medium format rangefinder such as a Bronica 645 or a Mamiya 7 that is about the same heft as a modern 35mm SLR. And you can get a medium format rangefinder (used) that will give you a 6cm x 9cm negative.

The turn of the century (the one we had six years ago) saw a resurgence of rangefinder popularity. In the past 6 or 7 years, new 35mm rangefinder camera models emerged from Konica, Zeiss-Ikon, Hasselblad, Nikon, Voigtländer, Rollei, and the patriarch of rangefinder cameras, Leica. And for those who want to buy used rangefinder, there are thousands available on ebay and used camera stores such as KEH and Ritz Collectibles (not the Ritz Camera chain).
Who should buy one? Anyone serious about film photography who shoots subjects that can be captured with a lens length between 12mm and 135mm. That probably describes most 35mm photographers. It’s a pity that they thought they needed an SLR for their work and allowed the rangefinder to slip into relative obscurity.

Anyone interested in further reading on classic rangefinders are urged to pay a visit to Stephen Gandy's CameraQuest site. And if you decide to buy a new rangefinder and lens(es), CameraQuest is a good place to start. Mr. Gandy sells new Voigtländer cameras and lenses and is a good guy to buy from.

Tuesday, June 13, 2006

PMK Pyro and Ilford FP4+

I'm relatively new to PMK Pyro, so I have only limited examples of its characteristics. Ilford FP4+ is lauded as being a good film to use with this developer. The image below was taken with FP4+ using a Jupiter lens.
Despite my focusing on Eric's eyeglasses, the Jupiter chose his sideburns. Nevertheless, the forehead and bokeh show the very smooth grain rendered with PMK Pyro. An enlargement from this frame gives you an idea of the smoothing effect rendered by the staining.


The image below was taken on Ilford FP4+ developed in PMK Pyro (this time with a Leica Summaron 35/2.8) .


Despite the use of stain versus silver metal in the negative, the image is extremely sharp. The enlargement of the hood ornament below shows grain, but the gradations are much smoother as in chromogenic films.

Pyro Developer - Part II

Why don’t more people use pyro developer? From the posts I’ve read on the Internet over the past six months, it boils down to the following (in decreasing order of importance):

  • It’s toxic. Well, most photographic chemicals are toxic, but I suppose that pyro is more toxic. Pyro is certainly more hazardous to your health when it is in powder form and can be inhaled. But in water, you can treat it like you treat any other mildly toxic liquid. You avoid getting it into your eyes, nose, and mouth, just like you would chlorine bleach, ammonia, and weed killer. Also, you have to avoid getting it on your skin as it can be absorbed through the skin. If you are careful, it won’t poison you (keep in mind that it used to be used as a hair dye, and that a current hair dye for men is a solution of lead acetate, another thing you don’t want to ingest). I do wear kitchen gloves while developing with pyro, but that is simply because my tanks are more light-tight than fluid-tight. If you buy the pre-mixed developer, you can eliminate the greatest hazard, i.e., inhaling the power while mixing up the stock solution. I use PMK Pyro and haven’t tried the other formulas. So from now on, whenever I mention pyro, I’m referring to PMK Pyro.
  • It’s fussier than most conventional black and white developers. If you are lazy or try to multitask while developing your film, you won’t like pyro. It has a tendency to streak if you are not rigid in following instructions. You’ll get the idea when I go through the workflow below.
  • It may not work well with your favorite black and white film. As I mentioned in the previous post, it does well with older style films rather than the new, tabular films, and it doesn’t work well at all with some slow films.
  • It isn’t made by Kodak, Ilford, Agfa, Paterson, Edwal, or Ethol, so you probably won’t run across it in your camera store. You can get it pre-mixed from Photographer’s Formulary. If you like it, buy The Book of Pyro by the guru of PMK Pyro, large format photographer Gordon Hutchings.
  • You’ll need to change from your usual fixer, and you can forget the acid stop bath. Pyro is a staining developer, and acid removes the stain. So you should use water instead of a stop bath, and you need to use an alkaline fixer. Photographer’s Formulary TF-4 Archival Rapid Fixer is ideal.

I mentioned that it is fussier than conventional developers. Pyro gives you a usable negative by staining the areas of exposed silver, and it is prone to streaking. You might want to write down the work flow as it is the strangest set of directions I’ve ever had for a black and white developer.

Before you mix up the stock developer, you should mix the fixer (1+3) in distilled water. TF-4 fixer concentrate is a turbid solution with thick layer of fine, white sediment that slowly dissolves in the stock solution. You need to agitate the concentrate to put the sediment into suspension, measure out the appropriate amount of concentrate, and then mix it with 3 parts of distilled water. You have to be sure that it is crystal clear before you use it or you will have thousands of tiny white specks appearing on your prints. Just to be safe, I mix the fixer before even loading the film in the tank.

To make a working stock solution of PMK Pyro, you mix the two concentrates with distilled water in a dilution of 1+2+100 (some lower-staining films require half the amount of water). A mixing syringe works very well for this. Within a few minutes, the solution darkens a bit, to the appearance of apple juice. To be sure that there is enough pyro to completely stain the film, use 5ml + 10ml + 500ml water for each roll of film.

Here is the workflow:

  1. Pour the developer into the tank and cap the tank (I use Paterson).
  2. Invert the tank several times and thump the base of the tank to dislodge bubbles.
  3. Invert the tank twice every 15 seconds.
  4. After each inversion, set the tank down and rotate it 90 degrees clockwise or counterclockwise (do one or the other, but be consistent). This will give more uniform staining without streaking.
  5. Continue the inversions for every 15 seconds for the prescribed development time.
  6. Pour the used developer into a jar or beaker (do not discard it). You won't confuse it with your fixer. By now it is probably the color of amber beer.
  7. Instead of a stop bath, use plain water (I use four complete refills of water in the tank).
  8. Pour the crystal clear fixer into the tank, following the fixer’s directions. Do not exceed the recommended fixing time.
  9. Pour out the fixer and pour the used developer back into the tank. Agitate every 30 seconds for two minutes.
  10. Discard the now twice-used developer.
  11. Wash in gently-running water for 20-30 minutes.

Okay, I said it was fussy, and pouring used developer into the tank after fixing does go against your instincts. But fixing the film exposes the silver a bit more to the staining effect of the develop, staining it a bit more deeply. Apparently the water cycle also increases the staining.

Which films work best with PMK Pyro? I’ve just scratched the surface. Ilford FP4+ works well. I recently bought some Fomapan and Fortepan. I’ll report on those results when I get them. Don’t use slow films unless you’ve read somewhere that they stain well with Pyro. I’m hoping that the cheap European films fare well with it.

Monday, June 12, 2006

Pyro Developer - Part I

I generally minimize disappointments by sticking with the tried and true in photography. My most often used lens is a “normal” lens (40mm to 55mm), I usually use TRI-X rated at the nominal ISO of 400, and I have historically used reliable D-76 in developing. I also like Rodinal, one of the oldest developers still commercially available today. So deciding to fiddle with pyro developer was out of character for me. Why fool with a 19th-century developer originally made from Chinese gall nuts that very few photographers even think of using today?
  1. It seems to work best with “older” emulsions. I wouldn’t recommend it for the newer tabular grain films. But with the conventional black and white films available from Europe and China for half the price of their newer cousins from Kodak and Ilford, I can afford to burn twice as many rolls each week. Ilford FP4+ is my favorite moderate speed film, and it works very well with pyro developers.
  2. It seems to work best with faster films. TRI-X and other 400 ISO films fare much better with pyro than do slower films such as Ilford Pan F+ (ISO 50). I don’t shoot many rock formations, ice sculptures, or bowls of fruit. Everything I shoot seems to be moving, so I need higher speed films. Agfa APX 100 is as slow as I can usually tolerate and still get usable frames.
  3. It stains the negatives. Why would anyone want a developer that stains the negatives a nauseating greenish-yellow? Because the stain goes right where the film was struck with light, and the intensity of the staining is proportional to the amount of light having hit the negative. Even this would not have made pyro developer appealing to me had I not used chromogenic black and white films for the past several years. Chromogenic black and white films are those that must be developed using C-41 processing, the same processing as color negative films. Instead of silver metal grains forming the image on the film, there are “dye fields” that are formed. The result is prints exhibiting very little visible grain. I have produced prints from 400 ISO chromogenic negatives that look like they were shot with 25-50 ISO silver halide film. Finer grain while maintaining high film speed is very appealing. Once you have shot Ilford XP2 or Kodak BW400CN film at ISO 400 with little grain, it is hard to go back to TRI-X; the grain appears gargantuan. The staining produced by pyro developers reduces the perception of grain associated with TRI-X and other fast silver halide films. One can use a grain solvent developer to reduce the grain of TRI-X, but then you reduce the apparently sharpness.
  4. It has a long shelf life. If I shoot with any regularity, my stock pyro solutions will be used up long before they have a chance to poop out. Better yet, pyro solution reportedly looks different when it is losing its potency. Mine hasn’t yet, so I don’t know the look of dead pyro yet. I’m not so trusting of other developers such as D-76 and XTOL. My rule of thumb is to dump down the sink anything older than 60 days even if it was in an amber bottle filled to the top.
  5. It takes up very little space. Like Rodinal, you can get pyro pre-mixed as a liquid. Unlike Rodinal, pyro is in two bottles, a small one with a light brown liquid, and a larger bottle with a clear liquid. My wife has appreciated the gradual disappearance of the 1-gallon amber chemical bottles littering the kitchen and my office.
Why not use pyro? If the above arguments are compelling, why doesn’t everyone use it? Perhaps a better question is why don’t I personally know another human on earth who uses it?

That’s the topic of my next post.

Sunday, June 11, 2006

Film Cameras in a Digital Age - A Rapid Extinction

Each month for the past few years, film photographers have lamented the loss of some entity tied to film-based photography. Kodak announced the halting of R&D for black and white developers, Agfa (Germany) discontinued film production, and Ilford (England) briefly halted the manufacture of film. Clearly the digital age is making the film and developer industry a losing enterprise.

The film camera industry is also beginning to unravel. It began with medium format cameras, the tools of professional photographers. Medium format camera makers are abandoning the genre at an alarming rate. Bronica bowed out, most of Fujifilm bowed out, Mamiya bowed out, Pentax bowed out, and Contax bowed out. If you want a medium format camera, Hasselblad and Rolleiflex are still available, if you have deep pockets. If you don't, you might think about something built in the Ukraine. And the 35mm camera makers are beginning to fold up. No more Contax film cameras. Minolta and Konica merged, then dropped out of the camera business. Nikon dispensed with most of its film cameras. And yesterday I read that the Hasselblad XPAN, a panoramic 35mm camera, is being discontinued. The reason? They use solder in their circuits, and lead is not enviro-friendly. It would cost too much to re-engineer the circuits to eliminate lead solder.

Enviro-friendliness and homeland security are making procurement of darkroom chemicals problematic. Local camera stores don't want to get saddled with developer and fixer sitting on the shelves when digital is what is moving. You can buy it from the larger retail stores on the web, that is, if they can ship it to you. Toxic? They won't send it.